

Vertical conveyor jam causes at infeed and outfeed points fall into four groups: lost product support, incorrect position, mechanical misalignment, or missing control confirmation. A jam alarm does not prove that a product is physically trapped. The alarm proves only that the transfer sequence did not receive the condition required to finish.
What Can the Jam Pattern Tell You?
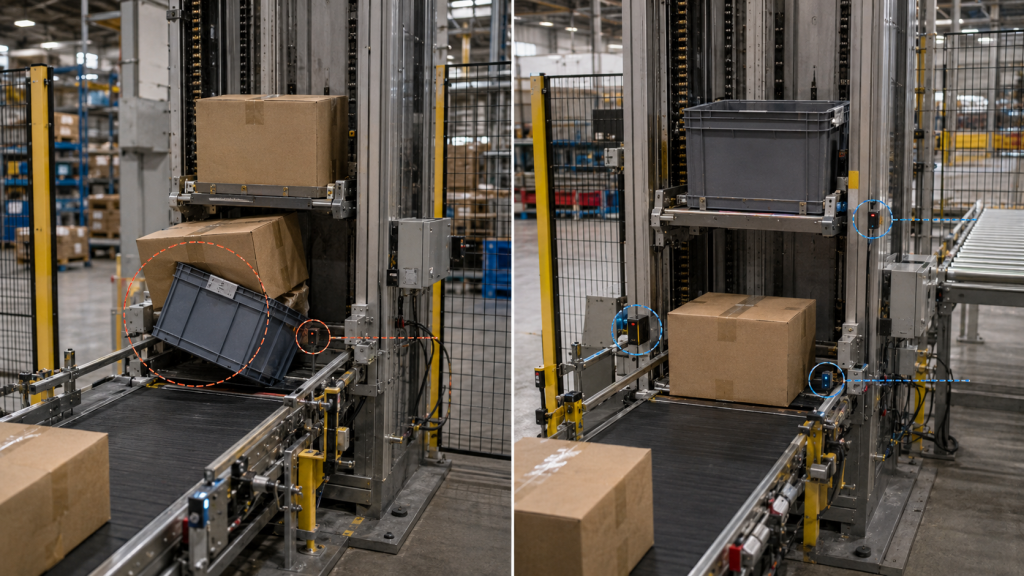
The stop pattern is often more useful than the alarm label. First decide whether the product is physically trapped or the control sequence is missing a required confirmation. Then record where the product stopped and which condition failed first.
A physical jam leaves visible evidence. The product may be caught in the transfer gap, tilted against a guide, partly outside the carrier, compressed by the next load, or blocked by damaged packaging or a foreign object.
A control-confirmation fault has no clear mechanical blockage. The system stops because product position, carrier alignment, transfer completion, carrier clearance, or downstream availability was not confirmed before the timeout.
| Observed pattern | Likely cause group | First check |
|---|---|---|
| The same product stops at the same edge | Product base, orientation, guide position, or transfer gap | Contact marks, bottom condition, and support path |
| All products stop at one level | Level alignment, transfer hardware, or position confirmation | Loaded alignment, sensor brackets, and carrier-position feedback |
| The jam occurs only at maximum load | Loaded deflection or carrier-position change | Carrier height and stopping position under load |
| No blockage is visible | Sensor state, sequence condition, or timeout | Live signals, alarm history, and last confirmed state |
| The fault begins after a product change | Product envelope, guide setting, recipe, or detection | Minimum and maximum size, orientation, and sensor response |
| The fault begins when downstream flow slows | Receiving-zone blockage or availability logic | Downstream-ready signal and occupied zones |
| The fault appears after extended operation | Contamination, looseness, wear, or position drift | Sensors, guides, fasteners, and carrier alignment |
| Reset restores operation for a short time | Intermittent signal or unresolved mechanical condition | Repeat pattern, event history, and exact trigger |
The alarm location is not always the root-cause location. A blocked discharge can prevent carrier release and later appear as an infeed fault. A product stopped against one guide can result from an earlier orientation or metering error.
Repeated contact at the same position moves product geometry and alignment higher in the inspection order. Random faults without visible contact move sensor behavior, product variation, and sequence timing higher in the inspection order.
A fault pattern sets the order of inspection; the fault pattern does not prove the final cause. Record the evidence first. Change one mechanical or control setting at a time. Multiple changes can remove the evidence needed to identify the actual vertical conveyor jam cause.
Which Product and Mechanical Conditions Cause a Vertical Conveyor Transfer Jam?
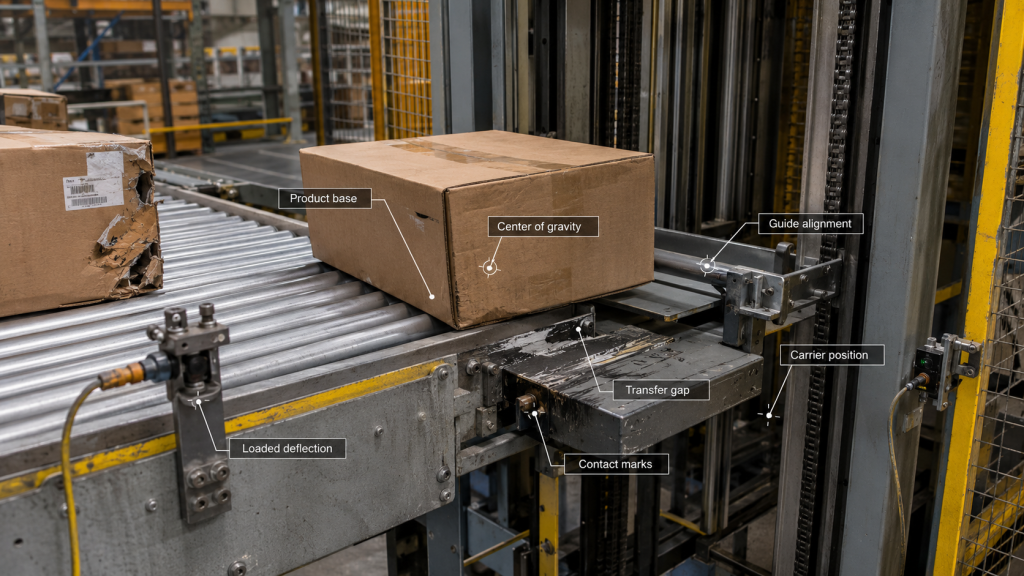
Most visible jams begin before the product stops. The load first loses support, alignment, or orientation. The transfer point then turns a small mismatch into a vertical conveyor product jam.
Inspection must follow the product’s contact path from the fixed conveyor, across the gap, and into or out of the carrier.
- Product base and packaging condition: Total product length does not define transfer stability. The effective contact base must cross the interface without sagging or catching. Soft bags, damaged cartons, open-bottom crates, uneven pallets, loose tape, folded flaps, and hanging film can all create local resistance.
- Center of gravity and orientation: An off-center load can turn as the support surface changes. Tall or narrow products become unstable when lateral offset moves the projected center of gravity toward the support edge. Products entering the guides at an angle can wedge between the rails.
- Transfer gap and support continuity: Excessive gap allows the product base to dip, tilt, or strike the receiving edge. Insufficient clearance can interfere with carrier movement or scrape the product. Gap approval must consider the smallest product base, bottom rigidity, loaded carrier position, manufacturing tolerance, and transfer device.
- Conveyor transfer misalignment: Vertical height, lateral centerline, carrier stop position, and guide continuity must match under operating load. Reaching the correct floor does not prove that the carrier and fixed conveyor form a usable transfer path.
- Carrier position and loaded deflection: The carrier can stop outside the approved transfer position or move under load. Deflection changes the operating height and can also change the effective gap during product movement.
- Wear, looseness, and contamination: Loose brackets, worn transfer rollers, damaged guides, uneven chain travel, debris, and broken packaging can move or block the transfer path. Inspection should focus on components that directly change carrier position, support, or guide clearance.
Record the loaded height difference, lateral offset, gap at both sides, carrier stop position, guide clearance, and product contact marks. Compare empty and loaded measurements and check stop position across repeated cycles. Terms such as “small gap” or “correct alignment” are not enough for vertical conveyor troubleshooting.
Transfer plates, nose rollers, and powered transfer sections can improve product support, but no transfer device corrects the wrong carrier position or an unsuitable product base. For the design limits behind these failure modes, see our vertical conveyor transfer design guide covering infeed alignment, support gap, and timing.
Which Sensor, Timing, and Flow Problems Cause a Vertical Conveyor Jam?
A vertical conveyor sensor fault can stop the transfer without a visible blockage. The control sequence is waiting for a required state that never arrived. Troubleshooting must find the first missing confirmation—not the final alarm.
- Product detection: Dirty lenses, reflector movement, loose brackets, unstable wiring, or incorrect sensor aim can create false product states. Dark, clear, reflective, flexible, perforated, or irregular products can also switch a basic photoelectric sensor inconsistently.
- Separate transfer states: Product arrival, correct staging, full carrier entry, infeed clearance, carrier clearance, and downstream availability are different conditions. One sensor cannot be assumed to confirm the complete transfer.
- Carrier-position confirmation: Product detection does not prove carrier alignment. A limit switch, proximity sensor, encoder, or position-control system must confirm the approved transfer position. Mechanical looseness or loaded carrier movement can still create misalignment after the position signal changes state.
- Timeout settings: A timeout detects that the expected state arrived too late. A timeout does not prove why the delay occurred. A short setting creates false jam alarms; an excessive setting delays the response to slipping products, slow transfers, or real obstructions.
- Transfer speed: Infeed and carrier surfaces do not always need identical speeds, but the speed relationship must remain controlled. An incorrect speed relationship can move the product out of position, change spacing, or prevent full carrier entry.
- Product metering: Each carrier cycle must receive only the approved product quantity. Double feed or insufficient spacing can push the first product, block a sensor, or leave part of the load across the interface.
- Downstream flow: An occupied discharge zone or missing downstream-ready signal prevents outfeed. The vertical conveyor must hold the carrier while upstream flow follows the defined stop, meter, buffer, or divert sequence.
Review the event history in the order the transfer should occur. Compare sensor transitions, carrier position, drive feedback, transfer time, timeout setting, and downstream-ready status between a successful cycle and a failed cycle.
Change one setting at a time. Extending a timer can hide a slow or unstable transfer without removing the vertical conveyor jam cause.
How Do You Troubleshoot a Vertical Conveyor Jam?
Effective vertical conveyor troubleshooting preserves the evidence before changing the machine. A reset only clears the current fault state. A reset does not remove the vertical conveyor jam cause.
Never enter or reach into the transfer area while unexpected motion or stored energy remains possible. Apply the equipment and site energy-control procedure before removing guards, moving a carrier manually, or clearing a trapped product.
Use the following troubleshooting sequence:
- 1 Record the fault before resetting. Capture the alarm, product type, carrier and level, transfer direction, stopping position, active sensor states, downstream status, and safe photos.
- 2 Inspect the product. Check for the wrong product, damaged packaging, loose film or straps, an unstable base, incorrect orientation, excess weight, or double feed. Confirm that the load remains within the approved product envelope.
- 3 Inspect the transfer point under load. Measure the transfer gap, loaded height difference, lateral alignment, carrier stop position, and guide clearance. Look for loose parts, debris, scrape marks, damaged rollers, or packaging contact.
- 4 Compare physical position with control signals. Review product-ready, carrier-position, transfer-clear, downstream-ready, drive-feedback, and timeout states. Find the first expected signal that failed to change. Do not bypass sensors, interlocks, or line handshakes.
- 5 Reproduce one condition at a time. Use the affected product or an equivalent test load. Change only one guide, sensor, speed, position, or timer setting before repeating the cycle. Several simultaneous changes can hide the root cause.
- 6 Verify the correction. Test the affected product, the least stable approved product, and normal operating rate. Record repeated cycles, transfer time, missed signals, product damage, and any renewed fault.
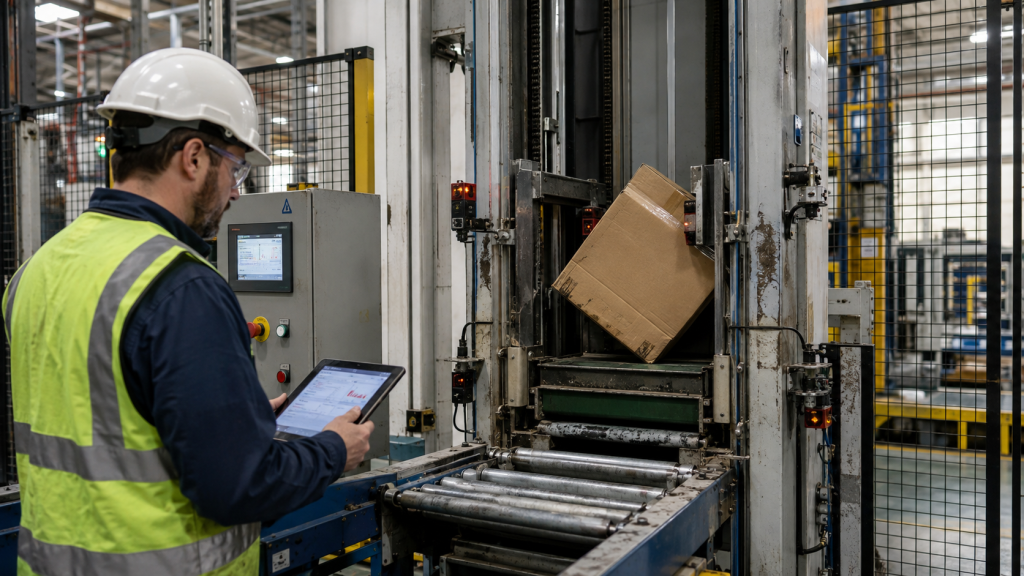
Cleaning, approved alignment adjustment, packaging correction, sensor repair, or sequence correction can resolve a local fault. Carrier or interface redesign is required when the approved product cannot maintain support, loaded alignment cannot remain repeatable, the product range exceeds the carrier envelope, or the required transfer rate exceeds the verified cycle.
Repeated adjustment is not a repair when the same conveyor transfer jam returns. Escalate the problem when each reset provides only temporary recovery, safe jam accessnot available, or one correction moves the failure to another point.
A recurring vertical conveyor jam is not a reset problem. A recurring jam means the product, transfer interface, or control sequence still contains an unresolved condition. Record the exact stop position and first missing signal, then change one variable at a time and verify the result through repeated loaded cycles. When the fault returns, moves to another point, or requires wider adjustment, stop tuning and review the transfer design. Send CS Conveyor the product data, fault records, photos, and layout for a transfer-point review and corrective recommendation.
FAQ
1. How can I tell whether a vertical conveyor jam is mechanical or sensor-related?
A mechanical jam leaves physical evidence such as rubbing, tilting, trapped packaging, impact marks, or incomplete product movement. A sensor-related fault has no clear obstruction, but the product position, carrier alignment, transfer clearance, or downstream-ready signal fails to change as expected.
2. Why does only one product size jam in the vertical conveyor?
One product size can have a shorter support base, different center of gravity, flexible bottom, poor guide fit, or unreliable sensor surface. Check the complete approved size range instead of assuming that equal product weight produces equal transfer behavior.
3. Why does the jam appear only after extended operation or return after reset?
A delayed or recurring jam points to a condition that changes during operation, such as contamination, loose hardware, positional drift, downstream buildup, unstable detection, or product variation. Resetting clears the alarm state; resetting does not remove the vertical conveyor jam cause.
4. Will reducing the transfer gap or increasing the timeout solve the jam?
Neither adjustment is a safe first response. A smaller gap can create carrier interference, while a longer timeout can hide slipping products, slow transfer, or missed detection. Measure the loaded alignment, product support, actual transfer time, and signal sequence before changing either setting.
5. When does a recurring conveyor transfer jam require redesign?
Design review is required when an approved product cannot maintain support, loaded alignment cannot remain repeatable, the product range exceeds the carrier envelope, or the verified transfer cycle cannot meet the required rate. Redesign is also required when safe jam recovery is not possible or repeated adjustments only move the fault to another point.
Post time: Aug-03-2026


